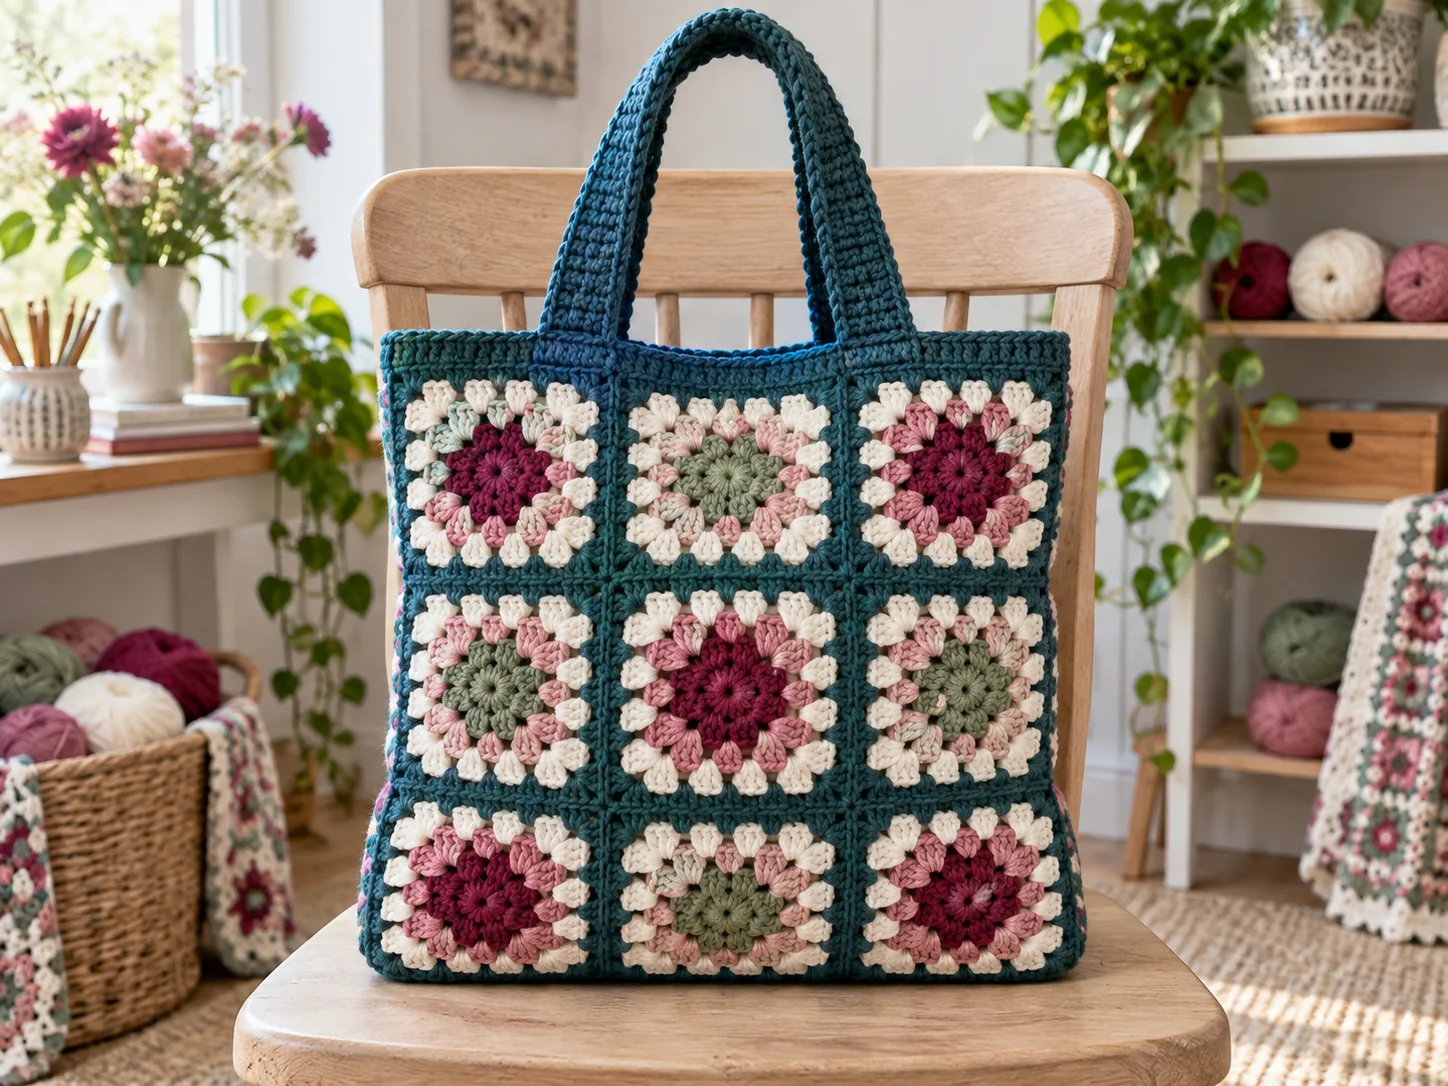
This tote turns eighteen traditional granny squares into two colorful panels. The motifs are portable, the joining is straightforward, and a dense top border gives the open clusters a stable place for handles.
Pattern overview
- Skill level: Easy
- Finished size: About 14 × 14 in / 35.5 × 35.5 cm
- Handle drop: 9 in / 23 cm
- Construction: Nine squares per side, joined in two 3 × 3 panels
- Terminology: US crochet terms
Materials
- 260 yd / 238 m deep blue-green for joins, border and handles
- About 500 yd / 457 m total divided among berry, blush, sage and cream
- 4.5 mm crochet hook
- Blocking mat and rustproof pins
- Yarn needle, scissors and stitch markers
Gauge
Each finished and blocked square measures 4.5 in / 11.5 cm. Make the first square before cutting yarn for the others. Add or remove a round if needed, but every square must finish at the same size.
Abbreviations
- ch: chain
- dc: double crochet
- sc: single crochet
- sl st: slip stitch
- sp: space
- st(s): stitch(es)
Notes before you begin
- A granny cluster is 3 dc worked into the same space.
- Ch-2 spaces form corners; ch-1 spaces separate clusters along a side.
- Change colors with a standing dc or join the new color in any corner space.
Make 18 classic granny squares
With the first color, ch 4 and join to form a ring.
Round 1: Ch 3, work 2 dc into the ring, ch 2; repeat 3 dc, ch 2 three more times. Join. There are four clusters and four corners.
Round 2: Join a new color in a corner. Ch 3, 2 dc, ch 2, 3 dc in the same corner; ch 1. In each remaining corner work 3 dc, ch 2, 3 dc, with ch 1 between corners. Join.
Round 3: Join a new color in a corner. Work 3 dc, ch 2, 3 dc in the corner, ch 1, 3 dc in the side ch-1 sp, ch 1. Repeat around and join.
Round 4: Repeat the established pattern, working a corner in every ch-2 sp and one cluster in every ch-1 side space. Join and fasten off.
Round 5: With cream, repeat Round 4. Join and fasten off.
Weave in ends. Block all eighteen squares to 4.5 in / 11.5 cm.
Arrange and join the panels
Arrange nine squares in a 3 × 3 grid for the front. Balance the colors before joining. Repeat for the back.
With right sides together and deep blue-green, slip stitch through the outer loops of corresponding stitches along each seam. Join squares into three horizontal strips first, then join the strips vertically. Keep the joining tension relaxed.
Join the bag
Place the two panels with wrong sides together. Starting at one top corner, sc through both panels down the side, across the bottom and up the second side. Work 3 sc at each lower corner so the edging turns cleanly. Do not join across the top.
Add the top border
Join deep blue-green at a side seam.
Round 1: Sc evenly around the opening, placing one sc in each dc and one sc in each ch-space. Join.
Rounds 2–5: Ch 1, sc in every st. Join.
The border should lie flat. Adjust the first round by a few stitches if it ripples or pulls.
Make and attach the handles
Ch 71 with deep blue-green.
Row 1: Sc in second ch and across. Turn. 70 sts.
Rows 2–6: Ch 1, sc across. Turn.
Fasten off with long tails. Make a second handle.
Center one handle on the front with about 5 in / 12.5 cm between its inner edges. Overlap each end with the top border by 2 in / 5 cm. Sew a rectangle and X through each end. Repeat on the back.
Finishing
Weave in all ends and steam lightly without pressing the iron onto the yarn. Check every motif join, especially where four corners meet. Reinforce any gap with the joining color.
Customize your tote
Use one background color to calm a varied palette, or make every motif identical for a graphic repeat. A fabric lining supports the open clusters and prevents small items from escaping. Make a larger tote with 4 × 3 squares on each side and a longer top border.
Pattern check
- All eighteen squares are the same blocked size.
- Front and back each contain a 3 × 3 grid.
- Motif seams are relaxed and secure at corner intersections.
- The top border lies flat.
- Handle ends are reinforced with rectangle-and-X seams.